

Hey everyone! Once upon a time I made a Sunburst Granny Square blanket for my niece, took some pictures and posted them on my old blog. And oh what a lot of question I got about it!! In particular:
1) What's the pattern?
2) What yarn did you use?
3) How did you join the squares?
So I thought it was finally time to write a proper post about one my favourite crafty projects of all time: The Sunburst Granny Square blanket!!
Now, the first thing I have to mention is that I did not design this from scratch. It is based on a pattern by Priscilla Hewitt, and the original pattern contains more rounds. I've posted the link to this original pattern severel times but apparently it doesn't work for a lot of you. If you are interested in the original pattern, please try this link - hopefully it will work.
Sizes & yarn
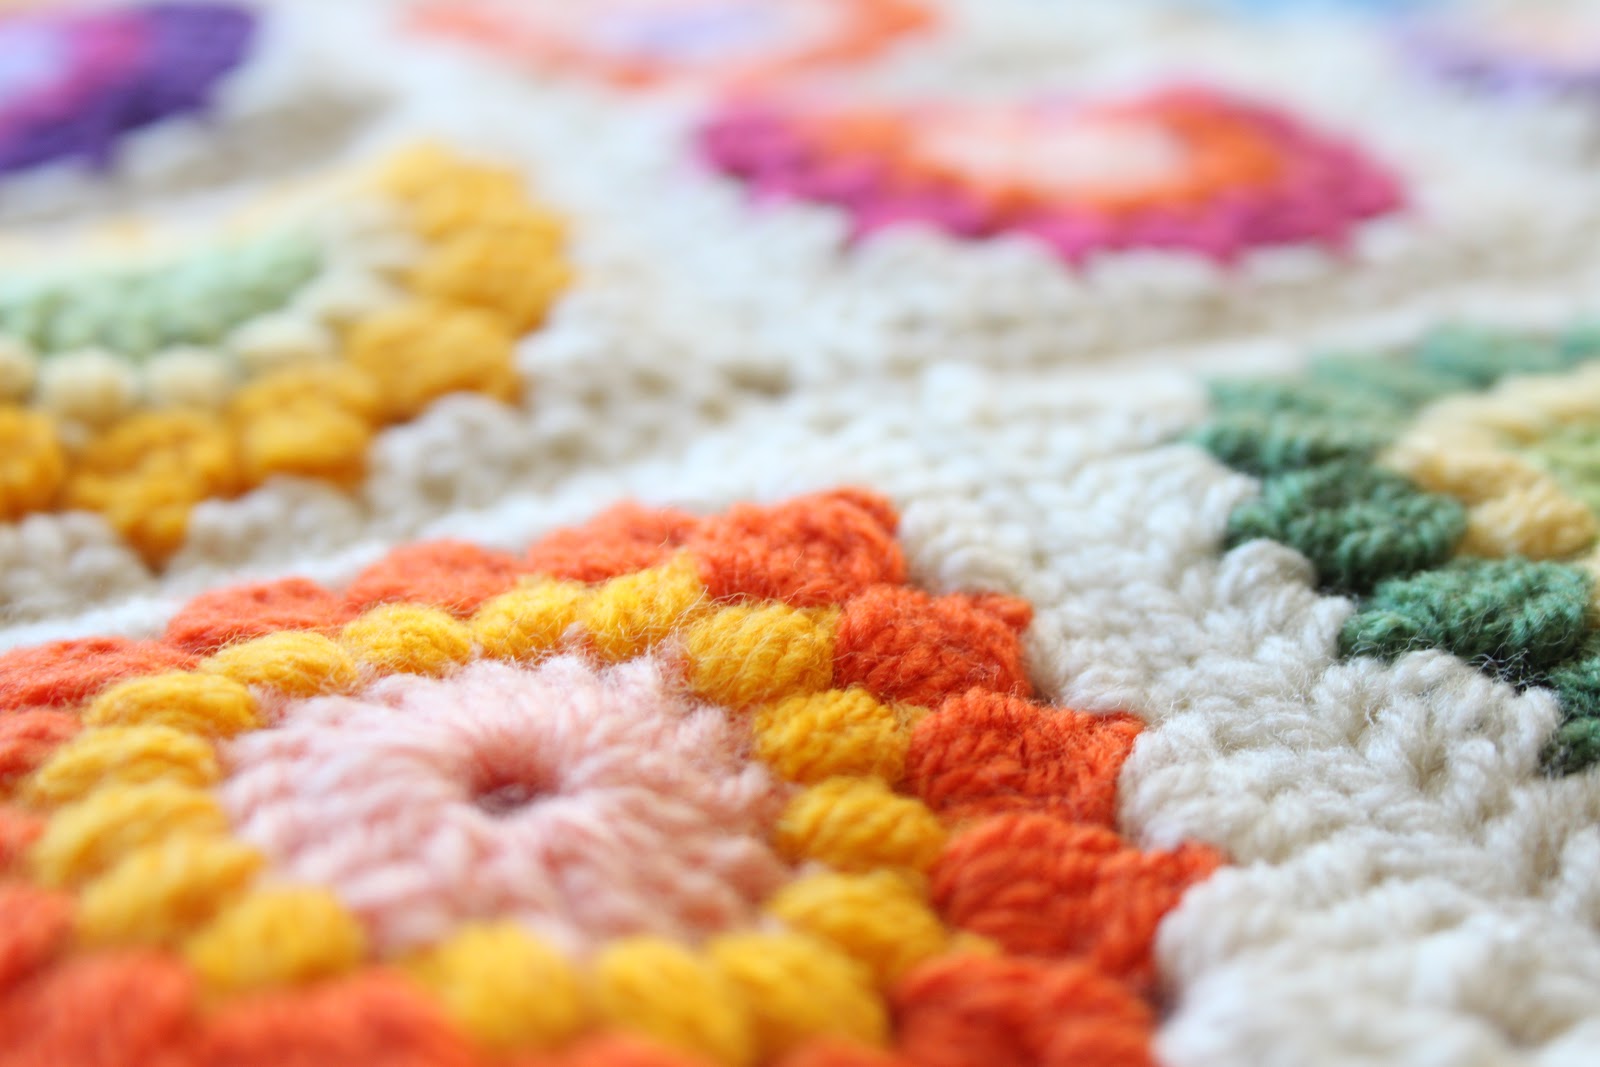
I used four rounds to make the Sunburst Granny Squares for the blanket, and they are about 4 inches in size. I used a 4mm crochet hook and Schachenmayr SMC Bravo. This yarn is 100% acrylic, machine washable and it comes in many, many great colors.
Stitches
Half double crochet (hdc): yarn over, insert hook in next stitch, yarn over and pull loop through stitch (3 loops on hook). Yarn over and pull through all three loops on hook.
Double crochet (dc): yarn over, insert hook in next stitch, yarn over and pull loop through stitch (3 loops on hook). Yarn over and pull through two loops on hook (2 loops remaining on hook). Yarn over and pull through two remaining loops on hook.
Puff stitch: *yarn over, insert hook in indicated stitch and draw yarn through stitch* three times (7 loops on hook). Yarn over and pull through all loops on hook. Chain 1 to lock.
Cluster stitch: *yarn over, insert hook in next stitch and pull up a loop, yarn over and pull through 2 loops* 4 times (5 loops on hook). Yarn over and pull through all loops on hook.
Treble stitch (trbl): Yarn over hook twice, insert hook into next stitch. Yarn over hook and draw yarn through stitch (4 loops on hook). Pull yarn through two loops (3 loops remaining on hook). Yarn over and draw through two loops (2 loops remaining). Yarn over and draw through the last two loops on hook.
Round 1
I prefer to start with a magic circle, but if you'd rather start with a chain: chain 5 and join with a slip stitch. Next, chain 3 to count as the first double crochet and work 15 more double crochet stitches into the ring. Join with a slip stitch to the top of the beginning chain 3. (16 double crochet stitches in total) Fasten off.

Round 2
Attach next color with a slip stitch to any dc, chain 1, puff stitch in the same stitch and in each dc around. Join with a slip stitch to the first puff stitch. (16 puff stitches in total) Fasten off.
Round 3
Attach next color with a slip stitch in the chain 1 space of any puff stitch, chain 2, (cluster stitch, chain 2) in the same space and in each chain 1 spaces around. Join with a slip stitch to the beginning cluster stitch. (16 cluster stitches in total) Fasten off.
Moment of choice: crochet together or join as-you-go?
Now you have a choice to make. If you plan to join the squares - to make a blanket for example - then you have to make a decision about how to join the squares before you start round 4. You have two options: finish all the squares seperately and sew or crochet the squares together* (in which case you can proceed with round 4) or join the squares as-you-go* (in which case you can proceed to make a required amount of three-round granny squares/rounds which you can eventually join).* For a tutorial about crocheting squares together, click here. For a tutorial about joining squares as-you-go, click here. Both tutorials are from the wonderful Lucy of Attic24.

For the blanket pictured in this post I used the first option (crocheting the finished squares together). As you can see in the above picture it looked very neat up close, but the overall effect was in my opinion a bit too wobbly (see picture below). This is probably because I did something wrong (like crocheting the squares together to tight?) but in any case I nowadays prefer to join my squares as I go, which gives a better 'flow' to the blanket in my opinion.

Round 4
Whatever you choose, you will need round 4 sooner or later. I prefer to use the same color (white or black) for every fourth round of every square to create unity, but of course you can use any color you want.
To start round 4 attach your next color with a slip stitch to any chain 2 space. Chain 4 to count as the first treble stitch and then crochet two treble stitches in the same space. Now, the next steps might sound a bit tricky, but it's not as bad as it seems: you're basically going to turn your Sunburst rounds into squares. In the picture below you can see which stitches you'll use for the straight lines (pink) and the corners (blue).

First crochet *3 dc in the next chain 2 space, 3 hdc in the next chain 2 space and 3 dc in the next chain 2 space*. You now made one of the four straight lines of your square. Next, you'll make your first corner: all in the next chain 2 space crochet 3 treble stitches, chain 3, and another 3 treble stitches. Repeat this sequence (straight line + corner) two times, then repeat from * to * (straight line) once. To finish your last corner: crochet 3 treble stitches in the same space as the beginning treble stitches, chain 3 and join with a slip stitch to the top of the beginning chain 4.
Fasten off and your Sunburst Granny Square is done!!

I had a lot of fun writing this tutorial, and if it proves at all helpful to anyone out there then that's a nice bonus ;) If you've made a Sunburst Granny Square blanket yourself, please post a link in the comments; I would love to see it! :)

Oh dear, ik brei gewoon een das.
ReplyDeleteIt's beautiful ! Thank you for this tuto :)
ReplyDeleteThank you and thanks for stopping by! :)
DeleteGreat post! I've started making those grannies a week ago using the link you shared before and i'm in love! I'm having some troubles with round 4 (stitches are way uneven) but i'm hoping i'll get the hang if it. Thanks for sharing!
ReplyDeleteThank you and good luck with that fourth round - I'm sure you'll get the hang of it with some practice! :)
DeleteThank you for the Sunburst Granny Square Blanket Tutorial. These blocks are gorgeous. I have run into a snag. I decided to join as I went. How exactly does one join as one goes when the fourth round has no chain spaces,(except at the corners)? Where do you join the blocks on the straight sides? I have looked for a tutorial, to no avail. Any suggestions?
ReplyDeleteHey Victoria!
DeleteI understand what you mean. You basically join the unfinished square (let's call it square A) with slip stitches to a finished square (let's call it square B), even though there are no chain spaces in the original pattern for the fourth round. For the straight sides this means: crochet 3 dc on square A, attach with slip stitch to square B, 3 hdc on square A, attach with slip stitch to square B, 3 dc on square A, and continue with a corner. I used the following tutorial by Lucy from Attic24, and if you look at picture #3-6, it hopefully is clear what I'm trying to say:
http://attic24.typepad.com/weblog/joining-asyougo-sqaures.html
Anyway, thanks for your comment and I might add the join as-you-go method in my next tutorial, so I can include some pictures ;)
~ Jenny
I got it! OMGoodness... Thank you so much. This is so much more enjoyable than sewing them together at the end. :)
DeletePreciosa!!
ReplyDeleteThe tutorial is awesome - thank you so much! I just linked it on my own blog. =)
ReplyDeleteThank you - glad you liked it! :)
DeleteI LOVE your blog! I am challenging myself to complete a granny square blanket (http://missusslay.blogspot.com/2013/03/grannysquares.html) and just wanted to say THANK YOU for your detailed instructions. I can't wait to see what it looks like on my bed!
ReplyDeleteOk are these English or American crochet terms?
ReplyDeleteMichellle
Hi Michelle!
DeleteThese are mostly US terms. I've also posted the descriptions of the stitches & links to the tutorials in this post. Hope this helps!
~ Jenny
I've started this blanket as a gift for my friend who is going to be a mom soon.
ReplyDeleteThank you so much for such easy and correct instructions, it comes out so nice!
Here is a sneak peek.
http://akamatras.blogspot.gr/2013/03/sneak-peek-on-afrodites-blanket.html
Oh my! They look so wonderful!! :) Love your choice in colours & can't wait to see the finished blanket!! :)
DeleteMonths and months went by but I did finish it! Many thanks again Jenny, the baby just loved it! Here it is
Deletehttp://akamatras.blogspot.gr/2013/10/sunburst-granny-squares-baby-blanket.html
I dont know how many times I've come to see this perfect blanket of yours. And I've finally gathered the courage to make it :)
ReplyDeleteI've decided to buy the same yarn as you but I'll be ordering it online, 5 colors plus white for the borders. Do you have any idea how much yarn you used Total? And for the border alone? That would really help !
Thanks
Oh my... I'm sorry to say that I have no idea how much yarn I used for this blanket! :( I always buy my yarn at a local store and make sure I have at least one of my favourite colors in stock. Rounds 2 + 3 contain stitches that use quite a bit of yarn but if you are combining colors you will only use them every other square or so. Depending on the size of your blanket 1 or 2 of each color might be enough, but I'm truly guessing here... Regarding round 4 (white) you'll obviously need much more - maybe 4 or 5 depending on the size?
DeleteSorry I can't be of more assistance! And good luck with your blanket of course - feel free to let me know how it works out! :)
~ Jenny
Thank you for sharing this pattern.
ReplyDeleteThis is now my favourite "Granny square"
I love it!
Angie x
Trying this pattern as my first granny project. Love it. Thank you so much.
ReplyDeletethank you very much! Very well explained!
ReplyDeleteI am a beginner, so hopefully someone can help me out! I am just a bit confused, I have figured out how to make a magic circle, but how many stitches do I put into it? 5? I want to learn to do that instead of just chaining to start. Thanks!
ReplyDeleteHi Mary Cole!
DeleteGood of you to ask! In short: you will chain 3 (counts as the first double crochet stitch) and then crochet 15 double crochet stitches into the magic circle - so that's a total of 16 in this first round.
A bit more elaborate: follow the steps of the magic circle as shown in this video up until 00:31. (You end with 'locking' your circle by the 'chain 1' the lady mentions.)
http://www.youtube.com/watch?v=WLuSVyKvoUg
Then chain 3: this will count as your first double crochet stitch. Proceed with 15 double crochet stitches into the circle (instead of crocheting single crochet stitches as shown in the video). You are crocheting these 'over the thread itself' as the lady in the video shows at 00:44. When you're done, pull the yarn to close your loop (as shown in the video at 00:59), join with a slip stitch to the top of the beginning chain 3 and fasten off.
Hope this helps!
~Jenny
Hi, I love this (and it will be my first granny at all, so please have mercy with me, asking silly questions ;))I'm still not that sure how many sc will I do in the magic ring right at the beginning? (Sorry, I'm not a native speaker and just learning how to read english chrochet manuals)
DeleteI mean, I got the ring with ? sc and then i'm starting with 15 dc. but in how many sc's I got to crochet these? I hope you understand what I mean
I love this... But mine is very 'holey' yours looks tight and neat... Is my wool too cheap ?? I have only been crochet about 7 weeks and so far I have been making toys.
ReplyDeleteI want to make a cushion case so obviously I don't want gaps.. Should I use a smaller hook ?!?
Love your afghan and the bright colors. I recently made a simple granny square afghan and after I joined the squares with crochet, I crocheted several more rounds. It was VERY wobbly so I got out my wand steamer and streamed and blocked it. Turned out completely flat and beautiful. No pics-already gave to DGD who loves it. Steaming makes a world of difference.
ReplyDeleteNiece (and me, the mom) are still loving the blanket! I don't understand anything of your technical story, Jenny, but just loving this piece of art! This was the best birth present ever!
ReplyDeleteHi,
ReplyDeleteThank you for the Tutorial! I'm fairly new to crochet and have started making these Granny squares, but I'm stuck with one of the most basic bits! How do I Slip stitch in the next colour correctly after I have fastened off? Thank you
hello I popped over from daiper mum, this is a gorgeous pattern and a lovely blog, pleased to meet you, Heather x
ReplyDeleteGreat tutorial. Thanks. Working on one right now.
ReplyDeleteHow many colors did you use to make the blanket?
ReplyDeleteI love the colors you used here! What exact yarn did you use for the project? Thanks in advance! Can't wait to try this myself :-)
ReplyDeleteI used a 4mm hook and Schachenmayr SMC Bravo.
Delete~Jenny
It's beautiful ! Thank you so much for sharing! Can you tell me whether you are English or American ? I'm wondering in which language are your stitches ? :-)
ReplyDeleteThanks for this amazing tutorial! I made a blanket out of it! Have a look here: http://lisgillet.com/blog/sunburst-granny-square-blanket/
ReplyDeleteThanks again!!! Lis xx
Thanks Lis - I'm so glad you liked the tutorial! :) Your blanket looks amazing - lovely colors! Thanks for sharing! :)
Delete~Jenny
Thankyou so much for your hard work ! Your tutorial is so easy to understand and i am new to crochet, i have just completed my blanket but decided to do 1 more round to make the squares slightly bigger....which stitch did you use to go around the edge of the completed blanket ?
ReplyDeleteThis is by far the best starburst pattern and I love the pics! Thank you for putting so much effort into them! I am starting my blanket tonight!
ReplyDeleteI was looking for a not so feminine square pattern for Christmas stockings I am making for my family, and since we decided to use camoflauge yarn I needed to avoid the "flowery" look. Your pattern is amazing! Perfect for my project. I will send the final product when it's complete.
ReplyDeleteWow thanks for this tutorial, I have been trying to learn to crochet granny squares for ages and managed to make this one and it looks great. Excited to make a blanket now!
ReplyDeleteThis is GORGEOUS and I love the colors you used. So happy! I would love to link to this if you didn't mind.
ReplyDeleteI'm gonna make a blanket using this pattern its so beautiful!Thanks for sharing!
ReplyDeleteBeautiful pattern. I am attempting 52 weeks of granny squares and have chosen this pattern to use.
ReplyDeleteJust finished my blanket yesterday! This was my first attempt at granny squares, and I've gotten a TON of compliments! Here is the link to my picture! https://www.facebook.com/photo.php?fbid=10101597653252093&set=a.708115339243.2310967.22213869&type=1&theater
ReplyDeleteGoing to teach this to a bunch of friends and make a friendship blanket for a grieving pal.
ReplyDeleteMight have to slip in the odd garter stitch square for the non crochet participants...
Many thanks for sharing the instructions.
Such a beautiful stitch and a lovely finished blanket! Thank you for sharing this pattern.
ReplyDeleteThank you for your tutorial! It is easy to understand. 😀
ReplyDeleteI love this blanket! I'm getting ready to join my squares and am wondering if you joined the corners by the chain space or by the chain itself. Thanks!
ReplyDeleteBeautiful !!!! Thanks for the tutorial. :)
ReplyDeleteWell--- I know what I'll be starting tonight lol! Thanks for the Tutorial.
ReplyDeleteME NEEDS TO MAKE DIS!!!!!!!
ReplyDeleteLovely tutorial thank you. I have decided on a table runner as my first project. I am off to select my yarns now from my huge stash. Gloria x
ReplyDeleteI have made a Sunburst Granny Square blanket. I used 5 different colors and varied the colors throughout. You can see it at:
ReplyDeletehttp://www.ravelry.com/projects/katie55418/sunburst-granny-square-blanket-tutorial
Just a word of caution. . . I am not a big fan of the magic circle. Fortunately I had made a few squares and then washed them. My squares became bracelets as the magic circle gave way in the laundry. I can only imagine how devastated I would have been to wash the finished product and see all those squares fall apart. I am a firm believer in the tried and true method of the chain circle at the beginning.
ReplyDeleteI have made this in ALL the colours! And I've devised a method of joining the blocks completely continuously as you go; I've made notes on my ravelry page if its of any help to anybody: http://www.ravelry.com/projects/lizzypink/sunburst-granny-square-blanket-tutorial-2
ReplyDeleteI absolutely love this blanket, this is a great tutorial, thanks so much!!!
ReplyDeleteGreetings from Spain
So gorgeous! Thank you so much for posting this :)
ReplyDeleteSimply beautiful! Thank you kindly for the pattern!
ReplyDeleteWhat a wonderful blanket!! it's so gorgeous!LOVE IT.Thanks
ReplyDeleteI have question I hope you or someone can answer regarding joining the sunburst granny's as you go. I know how to join a traditional granny square as I go but with this one it's a little different since there are trebles and half doubles. When I join my square at the corner am I suppose to chain 3 or just chain one to join?
ReplyDeleteThanks for the tut, I've made my first sunburst granny square out of Rico Creative Cotton yarn and will make more for a lapghan. I added another round of Dc (UK terminology) just to finish off the square with a neat edge because, I want to seam the squares together with a yarn needle. My squares will need blocking, but apart from that, it's turned out well. :)
ReplyDeleteI would like the pattern for the granny square starburst baby blanket. I saw it in pastels on the web under this blog name. I have one that looks EXACTLY like it someone made me 33 years ago. It's a combination of granny squares and the chevron like stitch. Do you know where I can find the pattern. Lisap890@gmail.com
ReplyDeleteThank you for this beautiful pattern. I am planning to use only three colours and make a baby blanket....is it possible you can give new an estimate of how much yarn I would need.
ReplyDeleteThanks só much for sharing, your tutorial is very good and it helped me só much! The colors you used are great, you did a great job!
ReplyDeleteThank you for a great tutorial. I can't wait to start making these squares.
ReplyDeleteThis was a really great tutorial - even as a beginner it was really easy to follow. Thanks!
ReplyDelete